Chocolate chip cookies
By Veronica Gonzalez
Being in quarantine has been quite boring, so to keep busy I decided to join my little sister in her daily cooking. She usually makes dessert so we decided on chocolate chip cookies.
My sister and I split up the directions. She did the dry ingredients and I did the wet. During the baking and mixing I kept asking my sister for reassurance. I did not want to mess up anything.
We were doing great–or so I thought. My sister and I were rolling the dough when my sister realized something.
“We forgot the brown sugar!”
I just stared in awe and later we just ended up laughing about it. The only thing that came to my head was trying to mix the dough again with the sugar and that is what we did.
Once we got it to mix we rolled up the dough in small balls and propped them on the pan. We then put the cookies in the oven and waited.
My sister and I talked while we waited, we prayed they would come out good even after the malfunction we had earlier. Minutes later the timer went off and we went to check on the cookies.

They were ready and I took them out with my mittens, then let them on a plate to cool. We later tried them and they actually tasted really good. I was so excited and I would want to do this again.
Ingredients:
1 cup softened salted butter
1 cup white granulated sugar
1 cup light brown sugar packed
2 tsp pure vanilla extract
2 large eggs
3 cups all-purpose flour
1 tsp baking soda
½ tsp baking powder
1 tsp sea salt
2 cups chocolate chips (or chunks , or chopped chocolate)
Preheat the oven to 375 degrees Fahrenheit. Line a baking pan with parchment paper and put aside. In a bowl combine flour, baking soda, salt, baking powder. Set aside. In a separate bowl, mix butter and the two different sugars until combined, then beat in eggs and vanilla till soft. After, add the wet mixture to the dry ingredients and mix until combined. Add a 12oz. package of chocolate chips and blend well. Take 2-3 tbs of dough, roll them into balls and place them equally spaced on your ready cookie sheets. Bake in the oven for about 8-10 minutes. Check them, and take them out after they are barely starting to brown. Let them sit on the baking pan for two minutes before removing to the cooling rack.
Summer is just around the corner and what a better way to cool down from the California heat than with ice cream. I decided to try out a homemade ice cream recipe with my sister.
This was my first time making homemade ice cream and I was a little skeptical about it and wondered if it was really going to work.
Homemade ice cream
By Veronica Gonzalez
Ingredients:
1 cup of half and half cream
½ cup fresh raspberries
¼ cup sugar
2 tablespoons evaporated milk
1 teaspoon vanilla extract
4 cups crushed ice
¾ cup salt
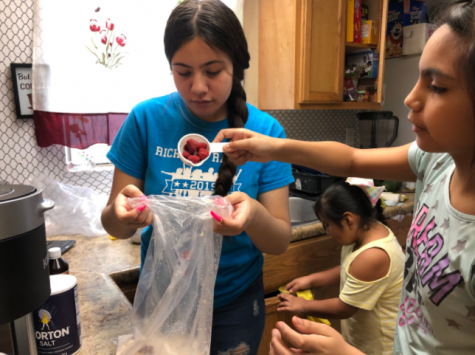
Using two 1-quart resealable plastic bags, place 1 bag inside the other. Place the cream, raspberries, sugar, evaporated milk and vanilla extract inside the inner bag. Seal both bags, pressing out as much air as possible. Place the 2 bags in a gallon-size resealable plastic freezer bag and add ice and salt to this last bag. Seal the bag, again pressing out as much air as possible. Shake and knead cream mixture until thickened. (If desired, wear mittens or wrap bags in a kitchen towel while shaking to protect hands from the cold ice.)
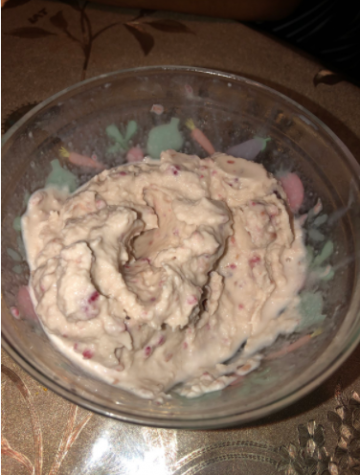
The ice cream texture was more on the softer side than regular ice cream but overall the taste was pretty good. If you don’t like raspberries, you can always add additional ingredients such as chocolate chips or mint extract to make your favorite flavor!
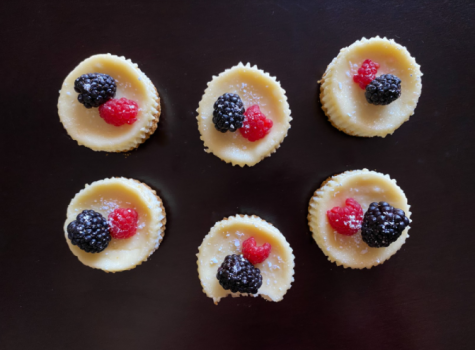
Mini cheesecake bites
by Emily Morales
To pass time and relieve my boredom, I like making desserts so I’m not glued to Netflix all day.
Sweets are especially easy to make — even my 10-year-old brother can prepare most desserts. One of my favorites is the miniature cheesecake.
It’d be best to have the measurements for the crust and the cheesecake filling measured beforehand.
Ingredients:
Crust
¼ cup of melted butter
5oz graham cracker crumbs
Cheesecake Filling
10 ½ oz. cream cheese
½ cup sugar
2 eggs
1 tsp. vanilla extract
1 tbsp. lemon juice
1 ½ tbsp. flour
6 ½ oz. sour cream
I started by making the crust first, which was the easiest step of all. I began by mixing the melted butter and the crumbs thoroughly in a bowl. After the crumbs were evenly moistened, I equally divided the mixture into muffin liners in a muffin tray.
Next, using a spoon, I pressed the crumbs tightly onto the liners and set aside.
Then, for the filling, I used an electric mixer on low speed. I mixed the cream cheese until creamy. It’s best to use it at room temperature to avoid lumps.
While mixing, I added the sugar little by little and the eggs 1 by 1 until well combined. Along with that, I joined together the flour, lemon juice, vanilla extract, and mixed again until it was all combined. Try not to over-mix.
Going back to the crust, I evenly divided the cheesecake filling into the rim in the muffin tray. I shook the tray to make the top surface flat and placed it in a preheated oven at 320°F for 15 minutes.
Lastly, after 15 minutes had passed by, I removed the tray from the oven and left it to cool. To make sure they are cooked, you can gently shake the tray to see if the cheesecakes wiggle a bit.
After about a good 40 minutes watching Netflix, I put the pan in the fridge to chill overnight.
The next morning, I washed some berries to use as a topping. I was curious to see if my attempt would be any good at all just because I’ve never made cheesecake myself.
I popped them out of the muffin pan and took a bite. Honestly, I thought they turned out quite good for a first attempt, and my siblings enjoyed them as well.
This recipe was fairly easy and definitely helped me pass time during these endless boring days.